Xbox One X Hard Drive Replacement
Over the weekend a friend posted an image of an error his Xbox One X has been throwing at random times over the past couple of months. A quick Internet search revealed the likely cause to be a bad hard drive. Of course I made the suggestion to try and get Microsoft to replace it, but I knew that the console was out of warranty because we both got our One X consoles at the same time (and mine is out of warranty). So I also suggested that he could replace the hard drive by following some iFixit instructions. Since I detest Seagate hard drives, and SSDs were on sale, I decided to follow my own advice.
Unfortunately, the iFixit instructions are currently only for the original Xbox One. Their Xbox One X page only has the teardown video at this time. As I got into this process I learned a few things that are worth sharing here. So the following is a basic summary of how to replace the hard drive in a Xbox One X.
Teardown §
It’s a generally easy process with the One X. You only need two screw drivers and a little patience. All screws that need to be removed are Torx T9 screws unless otherwise noted, and then they are Torx TR8 screws.
-
There are two screws on the back of the system to remove. One, on the right, is covered with a small “xbox” sticker that you must peal off and discard.
-
Push the top of the case forward (rear ports are facing you) about a quarter of an inch.
-
Slightly pull the left side of the top case away (to the left) from the system and rotate the top of the case up and to the right. The top case is held on by some hook tabs and this process will free it from the hooks and make it easy to remove (and replace later).
-
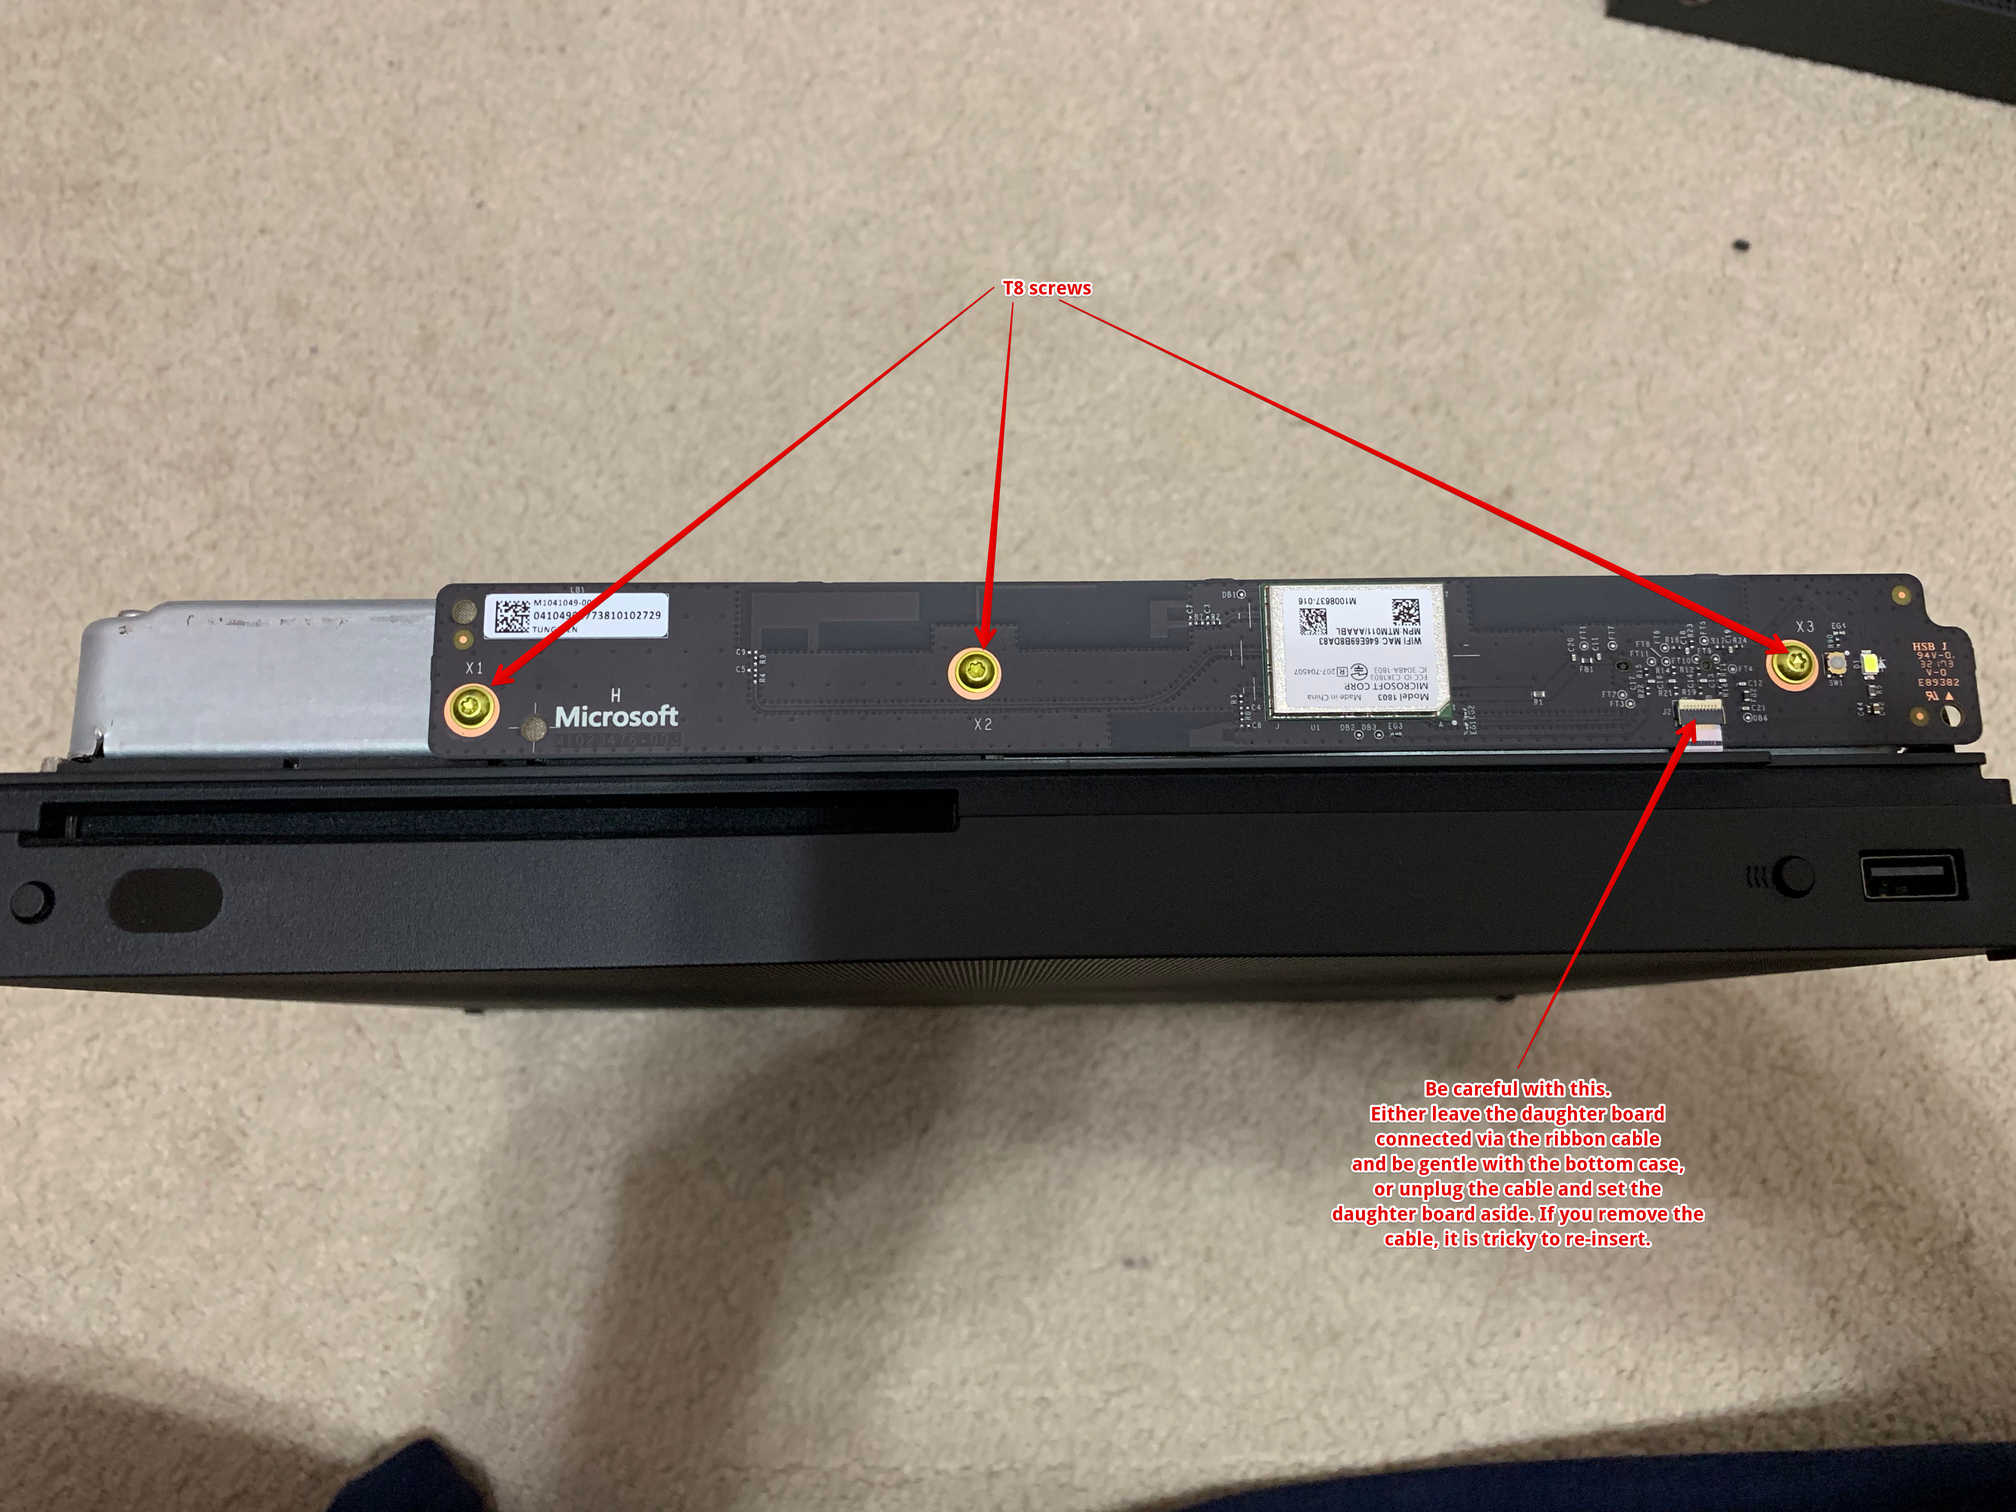
At this point, you will need to remove two daughter cards that are screwed on to the internal housing. The screws holding the daughter boards on to the housing are TR8 screws.
-
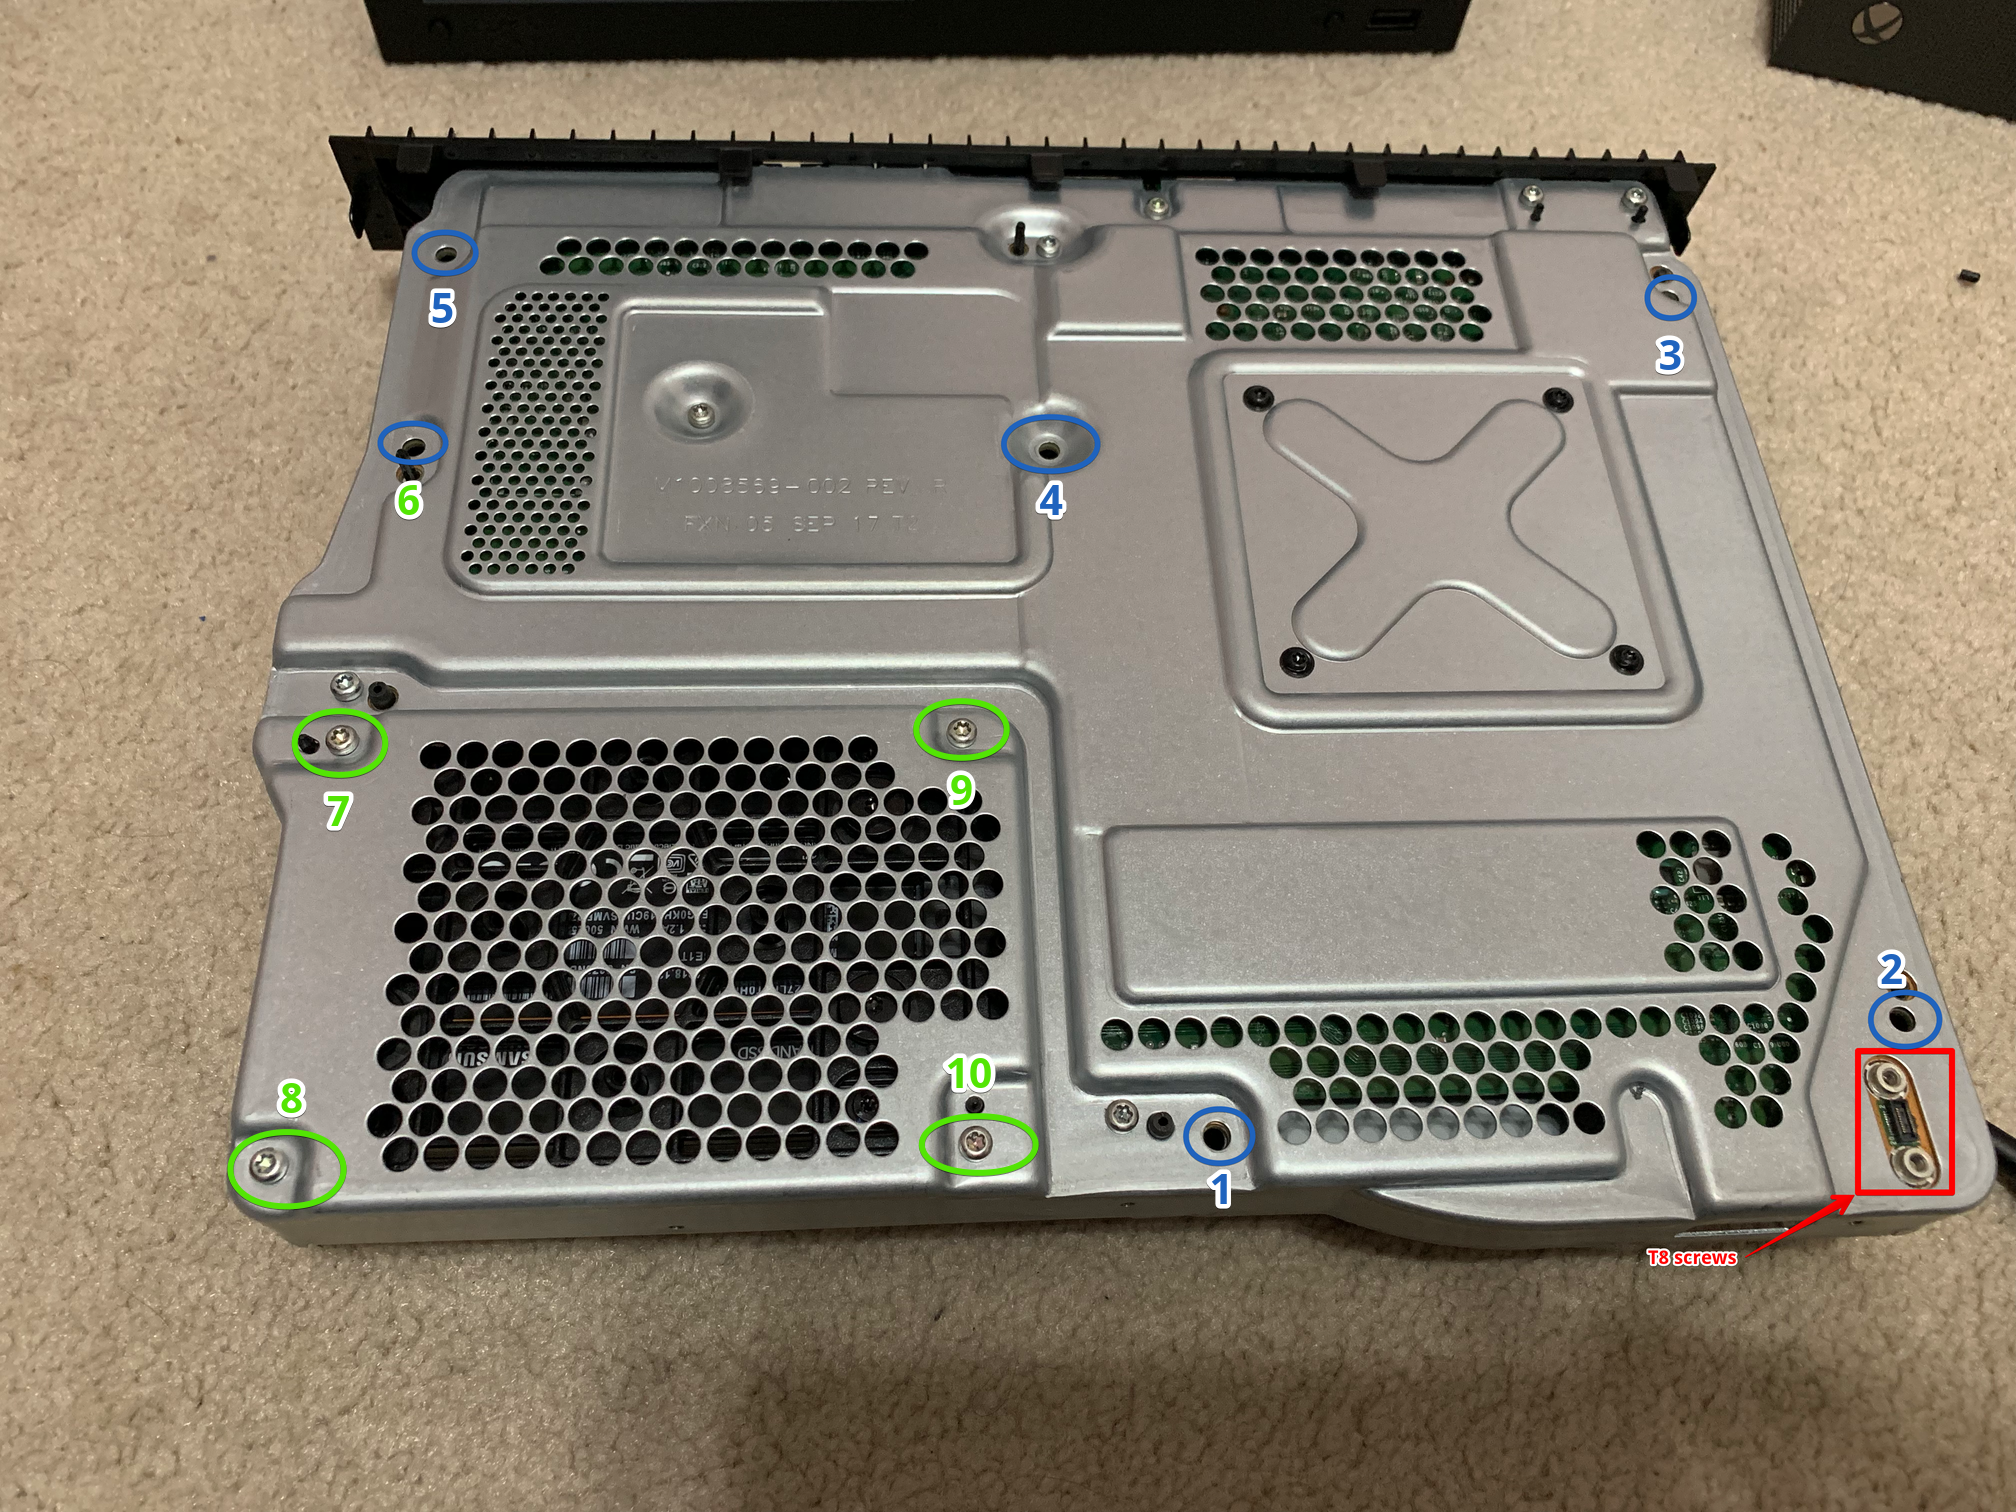
Next we need to remove the internal components from the bottom case. This is where the iFixit teardown video will get you into trouble. There are several screws that do not need to be removed. At this point you only need to remove the two TR8 screws holding a ribbon cable in place (unplug the cable and gently push over to the side) and the six screws circled in blue in the following image. The four screws circled in green (numbered 7, 8, 9, and 10) do not need to be removed until time to take out the hard drive.
-
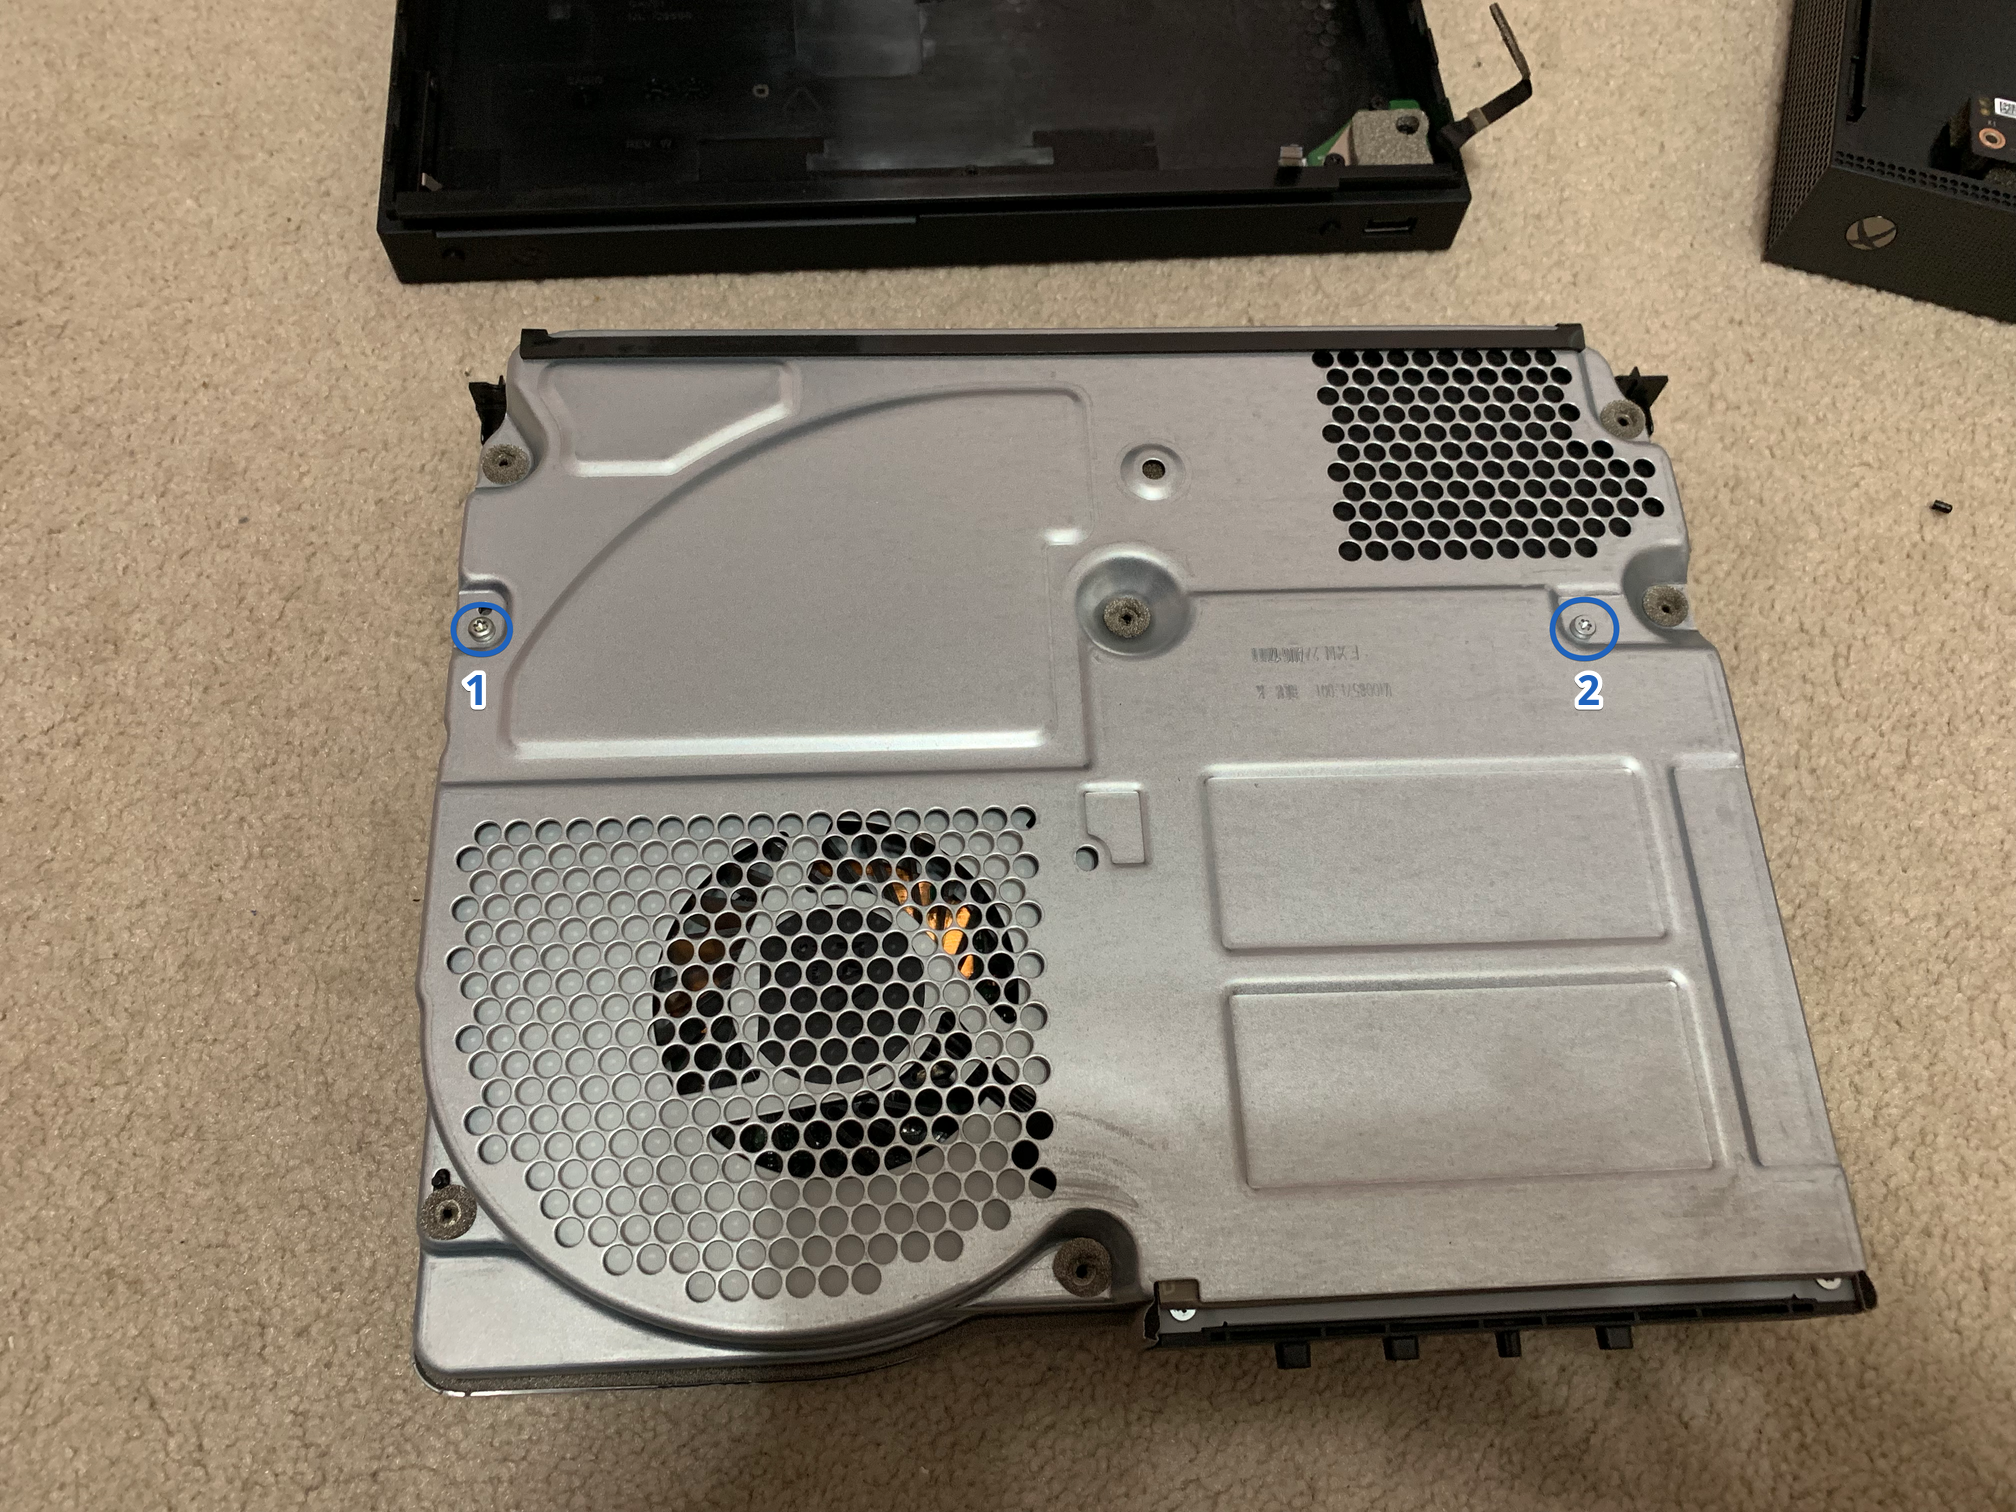
With those screws removed you can lift the internal cage away from the bottom case and flip it over to reveal the bottom of the cage. This will have two screws that need to be removed. They are circled in blue and labeled 1 and 2 in the following image.
-
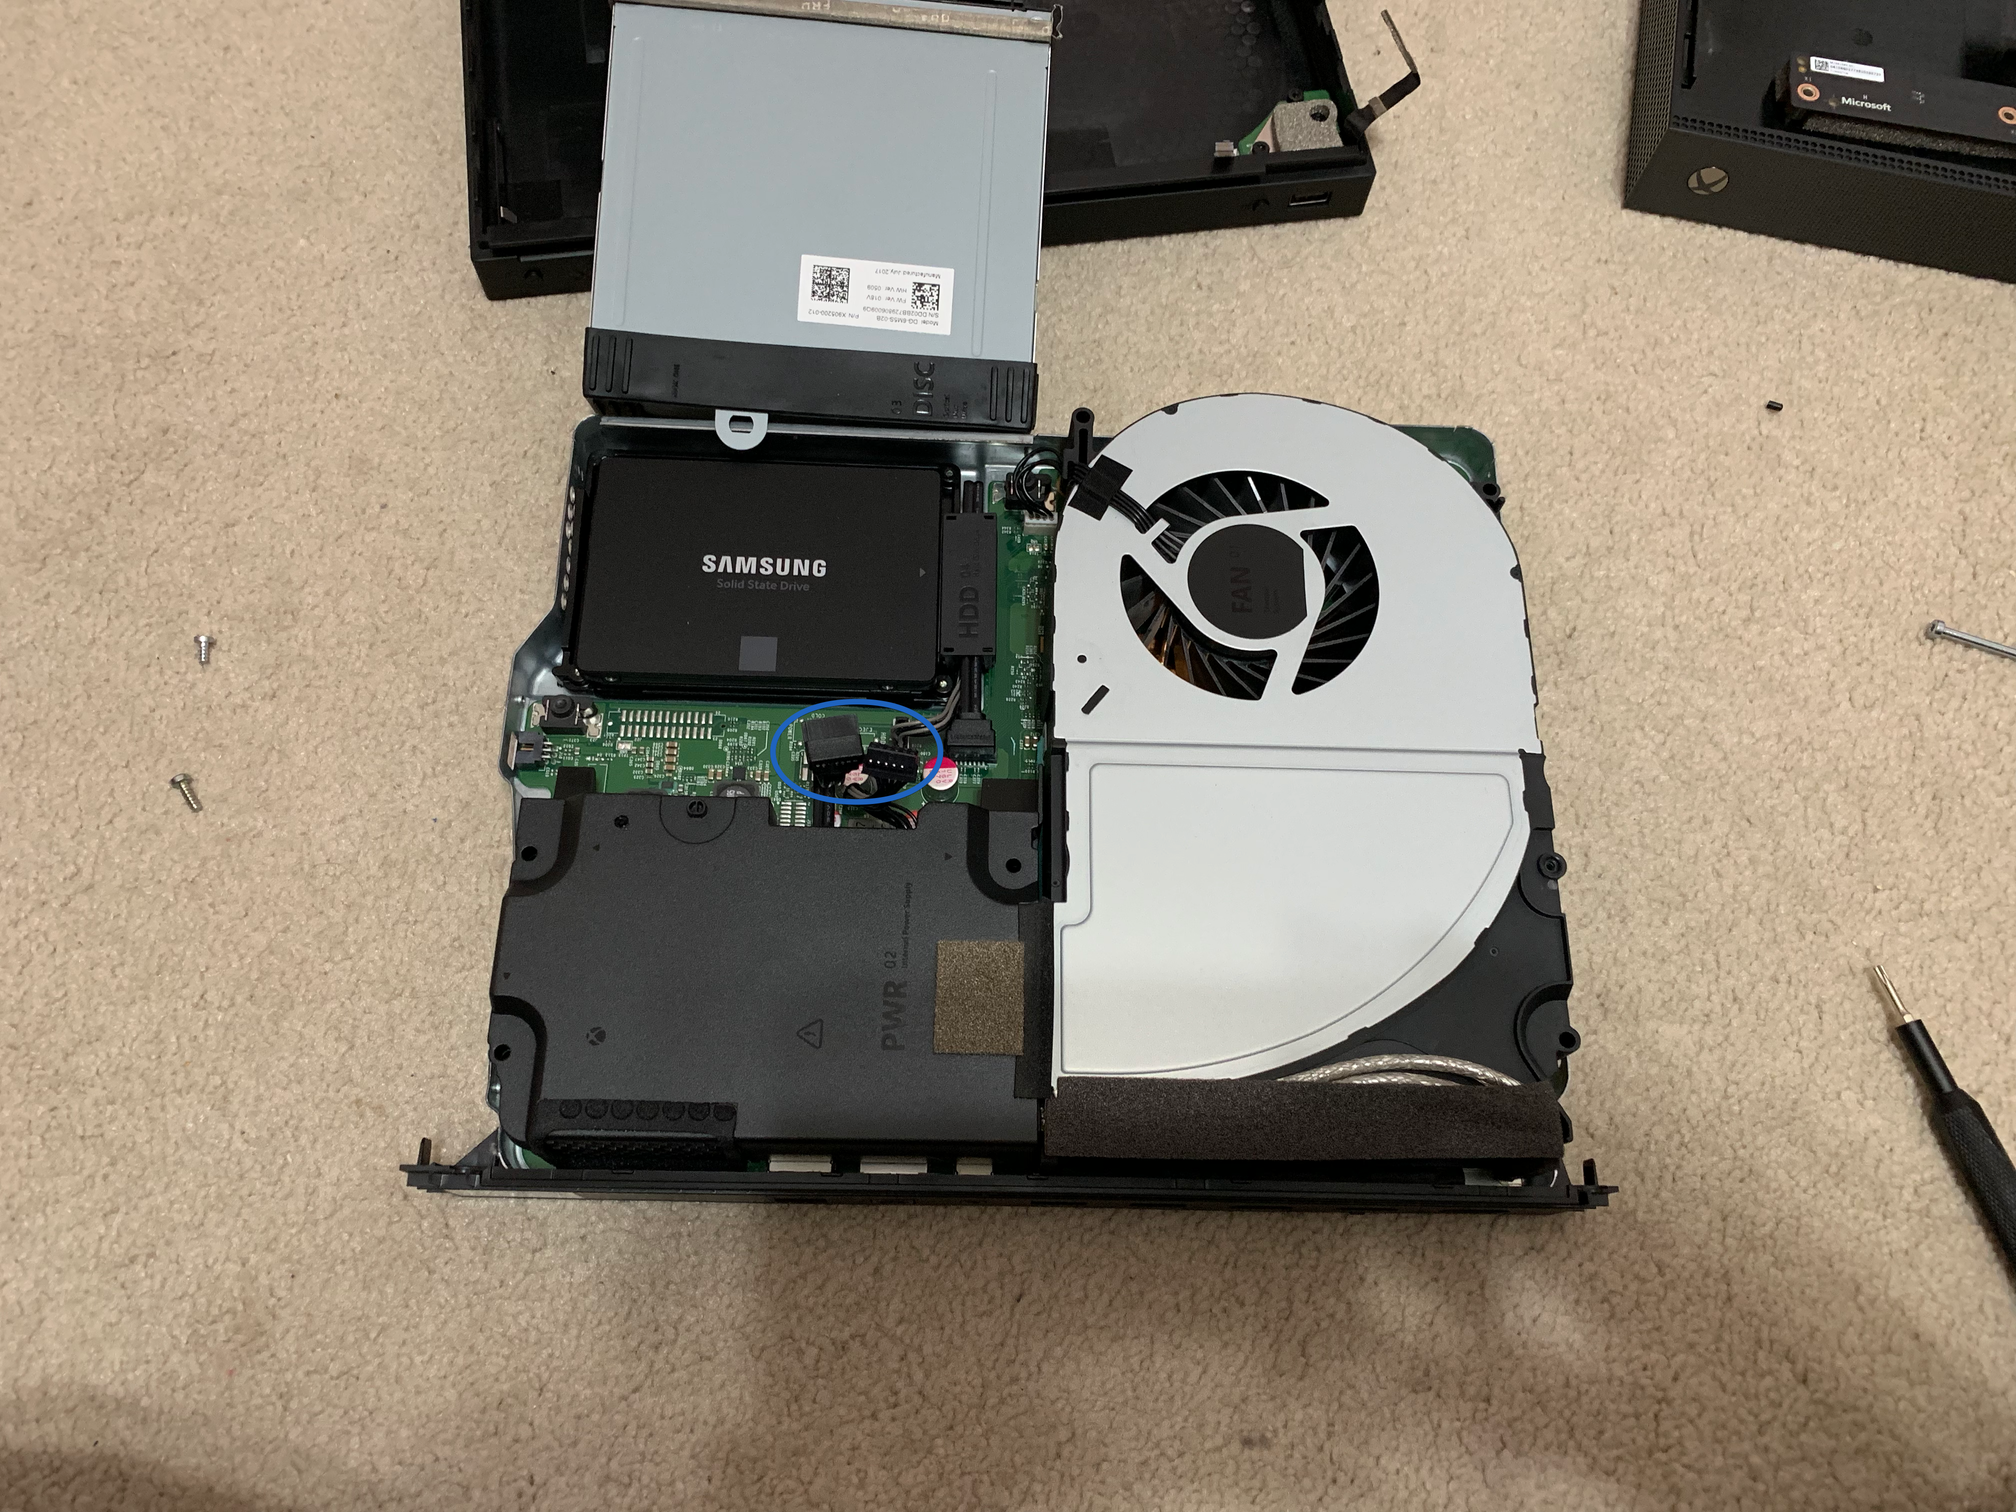
Now you can lift bottom half of the cage away from the top half to reveal the fan, power supply, and BD-ROM drive. We will remove the BD-ROM drive by lifting it up a little bit and then gently, but with quite some work, pulling the data and power cables off the back of the drive.
-
The hard drive is now exposed and you can remove it by removing the 4 green circled screws on the top half of the cage as mentioned in step 5 and the power/data cables from the motherboard. Once the harddrive is free from the cage you can remove the four screws attaching it to its tray. This will allow you to simply pull off the cable attachment from the drive.
Cloning §
This part will take a few hours. If you are upgrading to a larger hard drive, greater than 1TiB, then you will need to follow some other instructions. I opted to do a 1:1 swap between a spinning disk and a solid state drive. This means I merely needed to block copy the old drive onto the new drive. To do so, I put both drives in a USB 3.0 dock connected to my Mac Mini and used dd:
$ sudo dd if=/dev/rdisk4 of=/dev/rdisk5 bs=4m
Important §
If you are using macOS as I did, you should use Disk Utility, GUI or CLI, to unmount all of the partitions from the Xbox drive that the OS automatically mounted when you connected it. You should also double and triple check that your input drive (
if=) is the Xbox drive and your output drive (of=) is your destination drive.
If you are attempting this using Windows, it looks like there are several free utilities that can accomplish the job, but I cannot make a personal recommendation. Whatever you use, it should be doing a block-by-block copy. It should not be doing a “contents” copy.
Regardless of what you use to clone the original drive to the new one, it is going to take several hours. It took about 3 for me. Once the cloning is complete just revers all of the steps and you’ll be finished.